Tùy chỉnh button sử dụng XML Styles trong Android
Bước 1 - Tạo một dự án mới trong Android Studio, đi tới Tệp ⇒ Dự án Mới và điền tất cả các chi tiết cần thiết để tạo một dự án mới....


Bước 1 - Tạo một dự án mới trong Android Studio, đi tới Tệp ⇒ Dự án Mới và điền tất cả các chi tiết cần thiết để tạo một dự án mới.
Bước 2 - Thêm code sau vào res / layout / activity_main.xml.
<?xml version="1.0" encoding="utf-8"?>
<RelativeLayout xmlns:android="http://schemas.android.com/apk/res/android"
   xmlns:tools="http://schemas.android.com/tools"
   android:layout_width="match_parent"
   android:layout_height="match_parent"
   tools:context=".MainActivity">

   <Button
      android:id="@+id/customButton"
      android:layout_width="200dp"
      android:layout_height="wrap_content"
      android:layout_centerInParent="true"
      android:background="@drawable/custom_button"
      android:text="My Custom button"/>

   <Button
      android:id="@+id/customButton2"
      android:layout_width="200dp"
      android:layout_height="wrap_content"
      android:layout_centerInParent="true"
      android:layout_below="@id/customButton"
      android:layout_marginTop="24sp"
      android:background="@drawable/custom_button2"
      android:text="My Custom button"/>

   <Button
      android:id="@+id/customButton3"
      android:layout_width="200dp"
      android:layout_height="200dp"
      android:layout_centerInParent="true"
      android:layout_above="@id/customButton"
      android:layout_marginBottom="24sp"
      android:layout_marginTop="24sp"
      android:background="@drawable/custom_button3"
      android:text="My Custom button"/>
</RelativeLayout>
Bước 3 - Nhấp chuột phải vào res / drawable, Chọn mới → tệp tài nguyên có thể vẽ và thêm code sau vào custom_dialog.xml
<?xml version="1.0" encoding="utf-8"?>
<shape xmlns:android="http://schemas.android.com/apk/res/android"
   android:shape="rectangle">

   <stroke android:color="#66F9B9" android:width="4dp"/>
   <corners android:radius="16sp"/>
</shape>
Bước 4 - Nhấp chuột phải vào res / drawable, Chọn tệp tài nguyên mới → Drawable và thêm code vào custom_dialog2.xml
<?xml version="1.0" encoding="utf-8"?>
<shape xmlns:android="http://schemas.android.com/apk/res/android"
   android:shape="rectangle">

   <gradient android:startColor="#2AF598" android:centerColor="#ff1493"
      android:endColor="@color/colorPrimary"/>
   <corners android:radius="50dp"/>
</shape>
Bước 5 - Nhấp chuột phải vào res / drawable, Chọn tệp tài nguyên mới → Drawable và thêm code sau vào custom_dialog3.xml
<?xml version="1.0" encoding="utf-8"?>
<shape xmlns:android="http://schemas.android.com/apk/res/android"
   android:shape="rectangle">

   <solid android:color="#80121a" />
   <corners android:radius="999dp"/>
</shape>
Bước 6 - Thêm code sau vào src / MainActivity.java
package app.com.sample;

import android.support.v7.app.AppCompatActivity;
import android.os.Bundle;

public class MainActivity extends AppCompatActivity {
   @Override
   protected void onCreate(Bundle savedInstanceState) {
      super.onCreate(savedInstanceState);
      setContentView(R.layout.activity_main);
   }
}
Bước 7 - Thêm code sau vào androidManifest.xml
<?xml version="1.0" encoding="utf-8"?>
<manifest xmlns:android="http://schemas.android.com/apk/res/android"
package="app.com.sample">
<application
android:allowBackup="true"
android:icon="@mipmap/ic_launcher"
android:label="@string/app_name"
android:roundIcon="@mipmap/ic_launcher_round"
android:supportsRtl="true"
android:theme="@style/AppTheme">
<activity android:name=".MainActivity">
<intent-filter>
<action android:name="android.intent.action.MAIN" />
<category android:name="android.intent.category.LAUNCHER" />
</intent-filter>
</activity>
</application>
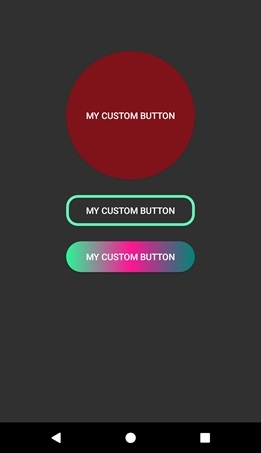
</manifest>Hãy thử chạy ứng dụng của bạn.

Victor Nguyen
@khuongnguyen0412
Khoa học - Công nghệ
/khoa-hoc-cong-nghe
Bài viết nổi bật khác
- Hot nhất
- Mới nhất